Large-format printing is your go-to for making a bold statement, whether it's through a towering banner, eye-catching exhibition stand, or vibrant PVC Banner. These prints aren’t just big - they’re meant to make a lasting impact. But the key to ensuring your message shines lies in one crucial step: proper artwork preparation.
In this blog, we’ll walk you through essential tips for getting your artwork print-ready, helping you maintain top-notch image quality and avoid common pitfalls. Stick around, and you’ll learn everything you need to know to achieve professional, standout prints every time.
Understanding Large Format Printing
What is Large Format Printing?
Go big or go home! Large format printing refers to the process of creating prints on a much larger scale than standard printing. From towering banners to eye-catching exhibition stands, this type of printing is perfect for making a big impact in public spaces or at events.
Where is Large Format Printing Used?
You’ve likely seen large-format prints in action at trade shows (exhibition stands), storefronts (signage and posters), and outdoor events (banners and flags). Large format printing is commonly used for promotional materials and anything where size and standing out really matters.
How is it Different from Standard Printing?
The biggest difference between large format and standard printing isn’t just size—it’s the setup, equipment and materials involved. Our large format printers use only the most advanced technology to produce crisp, clear prints on a variety of media, from vinyl and fabric to rigid boards like Correx®. Large format printing, is obviously on a much larger scale. This means that your artwork preparation will differ from that of our standard smaller print products.
1. Artwork Preparation
When it comes to large format printing, resolution and image quality are everything. The bigger the print, the more noticeable those details, or flaws, can become!
✔ DPI to Aim For:
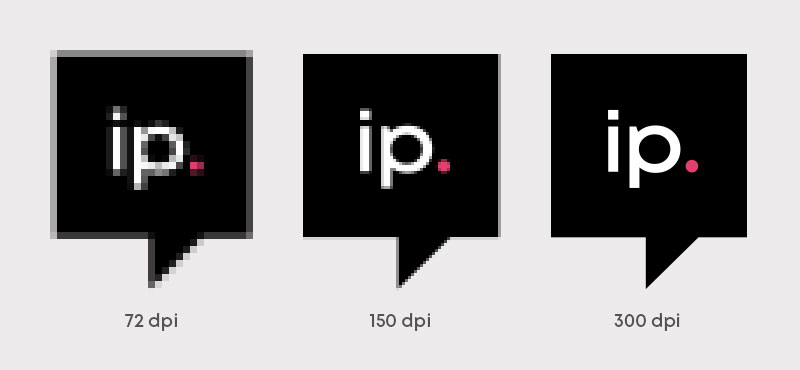
A sweet spot of 150-300 DPI is perfect for large prints. While small prints need 300 DPI or more, banners and exhibition stands, often viewed from a distance, look fantastic with 150 DPI—saving you from massive file sizes.
✔ Pick the Right File Format:
- PDF: The go-to for high-quality printing—keeps everything sharp.
- TIFF: Top-tier for images, but huge in file size.
- JPEG: Great for quick shares, but watch out for compression-reducing quality.
Nail the DPI and file format, and you’re on your way to perfect prints every time!
Still not sure? Here are some of our top reads to help choose the right settings!

2. Setting Up Your Design File
✔ Canvas Size:
Always match your canvas to the final print size, so what you see is what you get. If your banner is 2m x 1m, your file should be the same size. All of our artwork sizes are available to view on our product pages where you can also find handy downloadable templates to save any guesswork.
✔ Colour Mode:
Design in CMYK for print! While RGB looks bright on screens, it won’t translate to accurate print colours. Stick to CMYK to ensure your print comes out the way your envisioned.
✔ Bleed and Trim:
Don’t forget the bleed! Depending on the large format product you order, you’ll need to include a bleed—extra space around your design to prevent unwanted white edges after trimming. Make sure to keep important elements like text and logos away from the edge, so nothing gets accidentally cut off. We provide bleeds on all of our templates and they’re viewable on the ‘Artwork Help’ section of our website.
✔ Printed Sides:
Double-check that your file contains the correct number of printed sides. For instance, if you’re designing flags, they can be double-sided, so ensure that your artwork is set up to reflect this.
✔ Legibility:
Is your text legible? It’s essential that your audience can easily read your message from a distance, especially for large format prints like banners or exhibition stands. Ensure your font size is large enough, your choice of font is clear, and that there’s sufficient contrast between your text and the background. Remember, the goal is to grab attention, so don’t let hard-to-read text hold you back!
✔ Resolution:
Will your final print be crisp and clear? To ensure high image quality, double-check that your images are high-resolution, ideally at least 150 DPI. Low-resolution images can appear pixelated and unprofessional, diminishing the overall quality of your print. This is especially important for large format prints, where any imperfections can be magnified. Invest the time to use high-quality images that can stand up to close scrutiny.
✔ Layout:
Does your artwork layout match the chosen product? For example, exhibition stands wrap around, so be mindful that key information isn’t lost in the curves. Make sure that important logos, texts, and visuals are positioned strategically to ensure visibility from all angles. A well-planned layout can enhance the effectiveness of your display and ensure that your message is communicated clearly, regardless of how viewers approach your stand.
3. Keeping Important Elements Within Safe Zones
✔ Bleed Area:
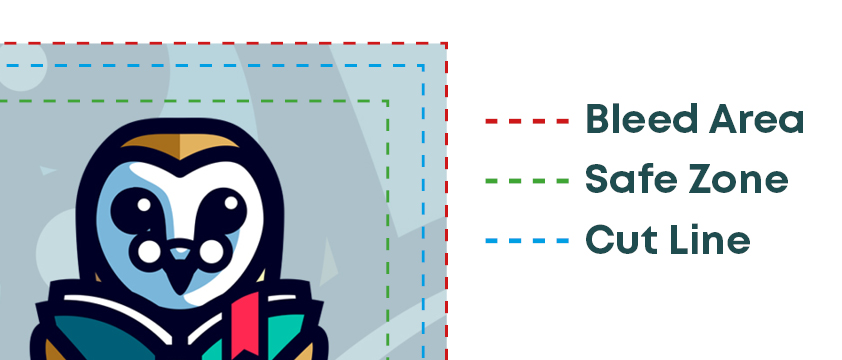
This is extra space around the edges of your design that gets trimmed off during printing. You’ll need to extend your design into the bleed area to avoid any unwanted white lines or gaps once the print is cut. Make sure your background extends into this area, but avoid placing important elements like text or logos here.
✔ Safe Zones:
Located inside the cut line, this area ensures that all crucial elements (like logos or text) stay far enough from the edges so they don't get clipped during trimming. Keeping your design's essentials within this zone is key to making sure nothing important gets lost.
✔ Cut Line:
This is where your design will be cut to its final size. Anything outside this line will be trimmed off, so make sure that the parts of your design that should be visible are safely inside the cut line.
✔ Stitch Line:
For products like PVC banners and flags, the stitch line is where your design will be sewn to attach it to poles or where eyelets will be added. Be mindful not to place any critical design elements too close to this line, as they may be obscured.

4. Utilising Templates and Resources
When it comes to creating stunning large format prints, leveraging the right resources can make all the difference! First off, using our provided templates is a game changer. These templates are specifically designed to match the exact dimensions and bleed requirements for our various products, taking the guesswork out of your design process. By starting with a template, you ensure that your artwork is print-ready and that everything fits perfectly—no surprises!
In addition to templates, we also offer a free Design Online Tool that allows you to create and customise your designs with ease. This user-friendly tool is perfect for anyone looking to experiment with layouts, colours, and graphics, all while being guided by the necessary specifications for large format printing.
If you ever find yourself needing extra assistance, our talented Studio team is just a call or click away! They’re more than happy to provide expert advice and help you navigate the design process. Plus, every order benefits from our free 10-point artwork check to ensure everything meets our print standards. This check covers critical aspects like image resolution, bleed, and text legibility, giving you peace of mind that your project will turn out exactly as you envisioned.
5. Reviewing and Finalising Artwork
Before sending your artwork off for printing, it's crucial to conduct a thorough review to ensure everything is perfect. Start with the basics: check your contact information is correct, make sure your text reads correct and ensure you’ve done a spell check—typos are easy to miss and can undermine your professionalism and impact.
| Artwork Check | Action |
|---|---|
| 1. Safe Zone | Are all important elements (text, logos, graphics) inside the safe zone? |
| 2. Background Bleed | Did you extend the background or necessary design elements into the bleed area? |
| 3. Image Resolution | Is the resolution of images and graphics high enough for large format printing? |
| 4. Color Mode | Are the colours converted to CMYK for accurate print output? |
| 5. Double-sided Printing Setup | If printing double-sided, is the second side set up according to the provided template? |
Conclusion
Preparing artwork for large format artwork is no small feat, but with the right practices in place, you can ensure stunning results! From understanding the importance of resolution and colour modes to meticulously checking your design dimensions and bleed areas, each step plays a crucial role in achieving the vibrant, eye-catching prints you envision.
Taking the time to prepare thoroughly can make all the difference, so don’t rush this important phase. If you have any questions or need assistance, our Studio team is here to help! Don’t hesitate to reach out or explore our resources for even more tips and tools.
Need Further Help? Let Our Studio Team Assist You!
Feeling unsure if your design is set up perfectly or just need a bit of guidance? Our expert studio team is here to help! Whether you’re tackling issues with bleed, safe zones, or simply want a second opinion on your artwork, our friendly designers can review your file to ensure everything is print-ready.
Just get in touch, and we’ll guide you through every step of the process.


