In the exciting realm of large-format printing, image quality reigns supreme! Whether you're crafting a jaw-dropping exhibition stand, a PVC banner that grabs attention, or a vibrant flag that pops, the clarity and resolution of your images can truly make or break your project. Think of high-quality images as the cherry on top—they not only amp up the visual appeal of your prints but also shout professionalism and attention to detail, leaving your audience in awe.
In this blog, we’re here to arm you with essential tips and best practices to keep your image quality soaring throughout the printing process. Get ready to transform your large format prints into show-stoppers with exceptional clarity and colour! So, let’s jump in and unlock the secrets to elevating your print game!

1. Capture Quality From the Start
Before we dive into maintaining image quality after capturing your photos, let’s take a moment to consider the importance of image quality right from the start. Whether you’re using a professional DSLR or your smartphone, the quality of your images begins with how you capture them.
Adjust your settings for quality shots: ensure you’re using the highest resolution possible and adjust the exposure to avoid dark or washed-out images.
Next, pay attention to composition techniques, consider:
- Framing your subject thoughtfully
- Utilising natural lighting
- Experimenting with angles to create dynamic images
Finally, don’t forget the power of editing! A few tweaks can enhance colours, sharpen details, and ensure your images are print-ready. By following these tips, you’ll be on your way to capturing captivating visuals that pop in large-format prints!
2. Choose Your Image Source Wisely
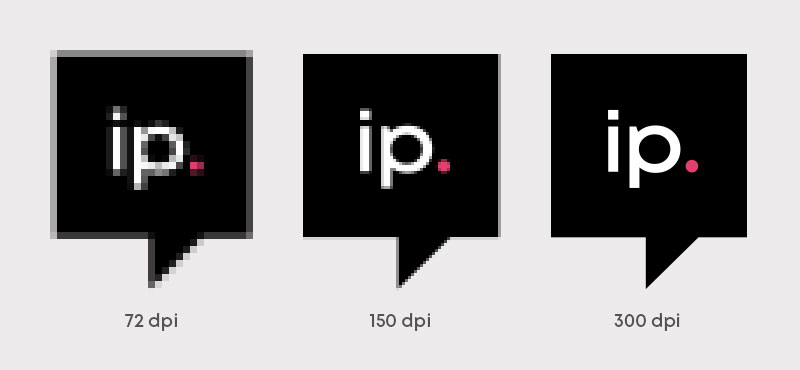
When it comes to large-format printing, choosing the right image source is crucial for achieving vibrant, high-quality results. First and foremost, image resolution plays a significant role; you want to ensure that your images are high-resolution (typically 150 DPI or higher) to maintain clarity and sharpness when blown up to larger sizes. Low-resolution images can lead to pixelation and have the potential to ruin the overall impact of your design.
Next, consider file formats. Opt for formats like TIFF or PNG, which preserve quality without losing detail. TIFF files are especially great for images that require high fidelity, while PNGs offer excellent transparency options, making them ideal for layered graphics.
Want to know more? Here are some of our top reads to help choose the right image source:
3. Ready, Set, Print! Prep Your Artwork Like a Pro
Getting your artwork ready for large-format printing is crucial to achieving stunning results. First off, setting the correct dimensions is essential—make sure your document matches the exact size of your final print. This prevents any surprises and ensures your design fits perfectly. We have a bunch of templates available on our website to help, just head to your chosen product page to download yours for free, with bleed, safety and cut lines also included! Alternatively, you can use our free Design Online Tool to get started.
Next up is the colour mode! Always, and we mean always, work in CMYK (Cyan, Magenta, Yellow, and Key/Black) to guarantee that your colours are accurately represented in the final print. RGB (Red, Green, Blue) might look vibrant on screens, but it can lead to disappointing results when printed and no one wants that. We can convert your colours but they may not be an exact match.
Finally, don’t forget about bleeds and safe zones! The bleed is the extra margin around your design that will be trimmed off, so extending your artwork into this area ensures no unwanted white borders appear. Meanwhile, keeping all important elements within the safe zone, will help avoid any cutting mishaps. With these best practices in mind, you’ll set your artwork up for success!
4. Optimising Image Quality: Keeping Your Prints Picture-Perfect!
When it comes to large-format printing, optimising image quality is essential to ensure your visuals are nothing short of stunning.
- Start by scaling images carefully; when you need to resize, opt for tools that maintain resolution to avoid pixelation.
- Next, boost your images with sharpening and enhancements—simple adjustments can make a world of difference, bringing out those fine details and vibrant colours.
- Lastly, steer clear of excessive compression. While it might save space, too much compression can lead to a loss of clarity and detail that’s crucial for high-quality prints.
By following these tips, you’ll set the stage for jaw-dropping visuals that leave a lasting impression! But don’t worry. If we see something that doesn’t look quite right we’ll flag it. With every piece of artwork, you get a free 10-point artwork check as standard and image resolution is just one of the things we keep an eagle eye out for.
5. We Proof Like Pros: Ensuring Your Artwork is Ready to Shine!
Before we hit print on any job, it’s crucial to approve or ‘proof’ your artwork. This step is vital to ensure what you see is exactly what you want to be printed.
When using our online proofing tool, take a moment to view and scrutinise your proof by zooming in on your PDF at 300%. This close-up view helps you catch any potential issues with resolution and image quality. If you’re happy you can click approve and send it to us or you can reupload your artwork when you’ve made your changes.
After that, your artwork will undergo our rigorous, free 10-point artwork check, where we'll flag any issues related to images or resolution. While we’ll do our best to fix these for you, we’ll reach out if we can't. Keep in mind that we can’t check for things like spelling or dates, but our Studio team performs 10 key checks before setting up your artwork for printing. This free manual artwork check ensures your design is print-ready every single time, giving you complete peace of mind!
Need a hand? Check out our blog on How to Upload & Proof-Check Artwork for Print.
6. State of the Art Image Printing
Once you hand over your approved files, our cutting-edge large-format printers take the reins, ensuring your images come out looking their absolute best. We’ve made major investments in industry-leading tech, so your artwork is in expert hands.
For stretch fabric displays and flags, the EFI VUTEk FabriVU 340i+ delivers vibrant, high-quality prints that are perfect for creating show-stopping designs.
If you’re working with roller banners, PVC, PVC-free, or mesh banners, the Vutek EFI Q3r has you covered. This powerhouse prints with precision, making sure your banner images stand out from the crowd.
And for all your flat media needs—whether it’s dibond, Correx®, or foam board—the EFI Vutek H5 brings your designs to life with sharp details and eye-catching colour.
Our commitment to the latest tech means your prints and images will always come out looking sharp, vibrant, and ready to make an impact.
Maintaining image quality in large-format printing is all about starting with the right image source, setting up your artwork correctly, and taking advantage of our state-of-the-art printing technology.
Conclusion
Ready to take your next project to the big stage? Apply these tips and watch your prints stand out from the crowd! If you have any questions or need assistance, feel free to get in touch with our friendly team, after all, we’re here to help make your next large-format print a success.
Need Further Help? Let Our Studio Team Assist You!
Feeling unsure if your design is set up perfectly or just need a bit of guidance? Our expert studio team is here to help! Whether you’re tackling issues with bleed, safe zones, or simply want a second opinion on your artwork, our friendly designers can review your file to ensure everything is print-ready.
Just get in touch, and we’ll guide you through every step of the process.


