.png)
Flags are an excellent way to wave down attention for businesses, events, or promotions. Their large, dynamic presence makes them a popular choice for outdoor advertising. However, setting up artwork for printed flags requires careful planning to ensure your design looks sharp, professional, and effective – you don’t want your design to raise any red flags among your customers after all. Rest assured though, our expert studio team will check all pieces of artwork via our famous 10-point artwork check, so you're in a safe pair of hands here at Instantprint.
In this blog, we’ll walk you through the essential steps to set up artwork for our entire range of flags, ensuring your design is so perfect, that it’ll have everyone saying, “I’m blown away by you!”
1. Check the Flag Size and Shape is Appropriate for Your Needs
Flags come in a variety of shapes like teardrop or feathered, with sizes ranging from small 1860 x 630mm through to XXL 4860 x 690m. Before you start designing, it’s important to choose the right size and shape for your needs. Each shape has unique proportions, which will affect how your design looks when printed.
For example:
- Small Feather Flag: 1860 x 630mm
- Small Teardrop Flag: 1515 x 687mm
2. Download and Use One Of Our Expertly Created Artwork Templates
Our team of print experts have done all the hard work setting design files up so you don’t have to! Handy, ey? All our templates typically include:
- Flag Bleed Area: You will need to extend your design to fill the bleed area. This area will be trimmed to make sure you don’t have any unwanted white lines.
- Flag Safe Zones: The 20mm inside of the cut line. Ensure all important points and text of your design are kept away from this area.
- Flag Cut Line: This is where we aim to cut your design to the finished size. Any part of your design placed on the outer side of this line will be cut off.
- Flag Stitch Line: This is where we aim to stitch your flag in order to attach it to the pole.
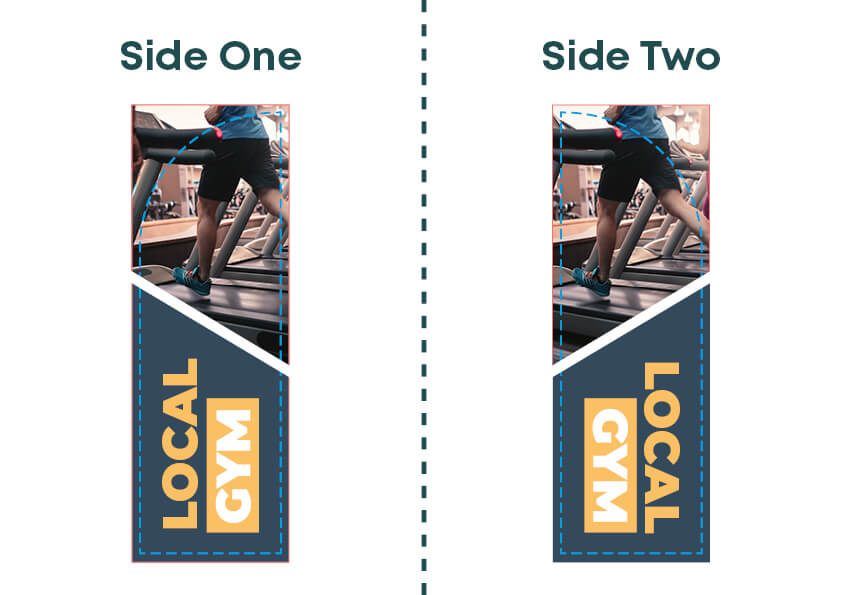
Printing double-sided? Your second side needs mirroring in order to print as expected. Can’t visualise it? Please see an example of a feather flag artwork perfectly set up for double-sided printing.
Feather Flag Artwork Templates:
| Small 1860 x 630mm |
Medium 2620 x 605mm |
Large 2860 x 690mm |
Extra Large 3860 x 690mm |
Extra Extra Large 4860 x 690mm |
|---|---|---|---|---|
| Photoshop | Photoshop | Photoshop | Photoshop | Photoshop |
| Illustrator | Illustrator | Illustrator | Illustrator | Illustrator |
| Indesign | Indesign | Indesign | Indesign | Indesign |
Teardrop Flag Artwork Templates:
| Small 1860 x 900mm |
Medium 2720 x 1030mm |
Large 3820 x 1200mm |
Extra Large 4270 x 1450mm |
Extra Extra Large 5360 x 1600mm |
|---|---|---|---|---|
| Photoshop | Photoshop | Photoshop | Photoshop | Photoshop |
| Illustrator | Illustrator | Illustrator | Illustrator | Illustrator |
| Indesign | Indesign | Indesign | Indesign | Indesign |
3. Set Up the Design File Correctly
Before diving into the creative process, it’s crucial to get the technical details of your design file right. You don't want to create a masterpiece only to realise it's the wrong size! Here’s how to set up your file in popular design software like Adobe Illustrator or Photoshop:
- Canvas Size: Match the dimensions provided in the artwork template, including any bleed requirements. Remember not to include the template layer when supplying your artwork.
- Scales: If your designer is working at a reduced scale, make sure the resolution compensates for the smaller size to avoid pixelation when full-size.
- Colour Mode: Use CMYK. If your artwork is in RGB, there may be slight colour changes during conversion.
- Pantone Colours: Pantone colours will be matched to CMYK as closely as possible on our state-of-the-art EFI VUTEk FabriVU 340i+.
- Fonts: Convert all fonts to outlines and ensure they’re not smaller than 62pt.
4. Design Within the Safe Zones
Keep all important elements like logos, text, and critical graphics within the flag’s 20mm safe zone to ensure they won’t be cut off during the printing and trimming process.
5. Account for the Bleed
Extend your design to fill the bleed area. This ensures your design extends to the edge of the flag without leaving white borders once trimmed.
6. Keep the Design Simple and Bold
Flags are often seen from a distance, so your design needs to be clear and easy to read. Use bold fonts, large text, and high-contrast colour schemes to enhance visibility.
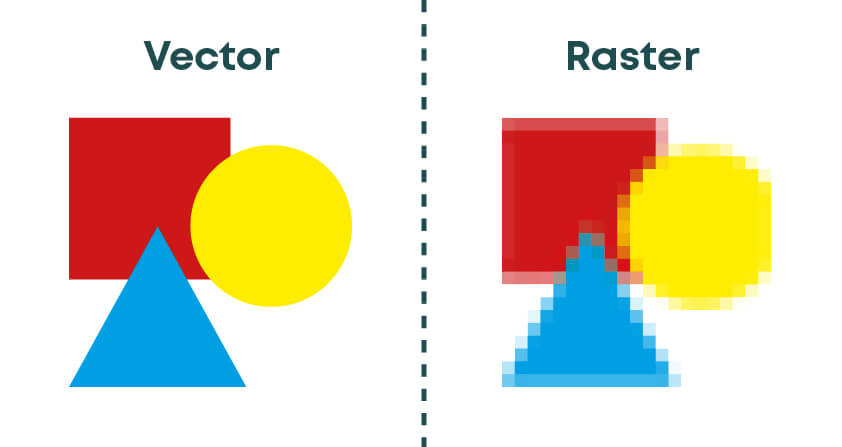
7. Use Vector Graphics
Whenever possible, use vector graphics (.AI, .EPS, or .PDF). Vectors allow for scaling without losing quality, which is crucial for large prints like feather flags.
8. Double-Check Image Quality and Text
Ensure any photos or raster images you use are at least 150 DPI at the actual size they’ll be printed. If using text, either outline it (in Adobe Illustrator) or embed the fonts so they are properly rendered by the printer. Rasterized text in software like Photoshop should also be at a high resolution to avoid any blurriness.
9. Save and Export the File
Once your design is complete, save your file as either:
- AI (Adobe Illustrator file)
- EPS
- JPEG or PNG (usually for simpler designs or if requested by the printer)
Make sure your export settings include the bleed, and that you’re saving your file in CMYK color mode.
10. Final Review
Before sending your design to us at instantprint, double-check everything is set up correctly to ensure your flag turns out exactly how you’d like it to:
| Artwork Check | Action |
|---|---|
| 1. Safe Zone | Are all important elements (text, logos, graphics) inside the safe zone? |
| 2. Background Bleed | Did you extend the background or necessary design elements into the bleed area? |
| 3. Image Resolution | Is the resolution of images and graphics high enough for large format printing? |
| 4. Color Mode | Are the colours converted to CMYK for accurate print output? |
| 5. Double-sided Printing Setup | If printing double-sided, is the second side set up according to the provided template? |
Taking the time to review these details can prevent costly mistakes and delays in production.
Conclusion
Setting up artwork for printed flags may seem daunting at first, but by following these steps, you can ensure that your design looks professional and prints perfectly. From choosing the right template to ensuring your design is readable from a distance, careful planning will help you create an eye-catching flag that stands out in any crowd.
Ready to get started? Follow these tips, and you’ll have your feather flag artwork print-ready in no time!
Need Further Help? Let Our Studio Team Assist You!
Not sure if your design is set up perfectly or just need a bit of guidance? Our expert studio team is here to help! Whether you're having trouble with the bleed, safe zones, or just want a second opinion on your artwork, our friendly designers can review your file and make sure everything is print-ready.
Simply get in touch with us, and we'll guide you through any step of the process to ensure your flags come out looking flawless. We’re just a message away!