You’ve just booked an amazing space for your exhibition to feature, it has great footfall and it’s close to all the main attractions, but does your exhibition stand up to the mark? In this guide, we’ll be taking a step-by-step approach to setting up your exhibition stand artwork for print and a few design tips to make sure you’re going to make a big impact at your next big event.
Designing an exhibition stand is a whole different ball game compared to crafting a standard and smaller print product. You’ve got to think big - literally! It’s all about grabbing attention and telling your story in a flash. The message needs to be shouted loud and clear so anyone passing by knows exactly who you are, what you do, and how you can make their lives easier. In this guide, we’ll show you how to set up your artwork perfectly, so you get nothing less than crisp images, bold colours, and razor-sharp text - because that’s what we do best!
Keep it simple, and striking, and let your visuals do the talking. After all, you’ve only got a few seconds to make a lasting impression - so make it count!
1. Check the Exhibition Stand Size and Shape is Appropriate for Your Needs
Our exhibition stands come in a variety of sizes such as 1x3, 2x3, 3x3 and 4x3, and picking the right size and shape is key to making your design pop. But what does “1x3” even mean? It’s all about the frame!
For example, a 1x3 stand is 1 box wide and 3 boxes tall, giving you a slim, vertical display. A 3x3 stand, on the other hand, is 3 boxes wide and 3 boxes tall, providing a longer, horizontal layout.
For measurements please see the below table:
| Exhibition Stand Size | Back of Frame (mm) | Side of Frame (mm) | Front of Frame (mm) | Printed Panels |
|---|---|---|---|---|
| 1 x 3 | 835mm | 306mm | 1240mm | 3 panels (1 front, 2 ends) |
| 2 x 3 | 1590mm | 485mm | 1930mm | 4 panels (2 front, 2 ends) |
| 3 x 3 | 2275mm | 685mm | 2540mm | 5 panels (3 front, 2 ends) |
| 4 x 3 | 2865mm | 960mm | 3070mm | 6 panels (4 front, 2 ends) |
| Podium Graphic | N/A | N/A | N/A | 1 podium graphic |
2. Download and Use One Of Our Expertly Created Artwork Templates
Our team of print experts has taken care of all the design setup for you - so you can skip the hassle! Pretty handy, right? All our templates typically include:
Exhibition Stands are printed on one sheet before being cut into panels. The template ensures that your design aligns correctly once printed, cut and put back together on your stand.
PVC Banner Artwork Templates:
| 1x3 2230 x 2019mm |
2x3 2692 x 2230mm |
3x3 3365 x 2230mm |
4x3 4038 x 2230mm |
|---|---|---|---|
| Photoshop | Photoshop | Photoshop | Photoshop |
| Illustrator | Illustrator | Illustrator | Illustrator |
| Indesign | Indesign | Indesign | Indesign |
3. Set Up the Design File Correctly
Before you start getting creative with your exhibition stand, it’s essential to nail the technical details of your design file. The last thing you want is to create an absolute showstopper, only to find out it’s the wrong size! Here’s how to set up your file correctly in popular design software like Adobe Illustrator or Photoshop:
- Canvas Size: Match the dimensions provided in the artwork template, including any bleed requirements. When supplying your artwork just remember to not include the template layer.
Scales: If your designer is working at a reduced scale, make sure the resolution compensates for the smaller size to avoid any pixelation when full size.
Colour Mode: Use CMYK (Cyan, Magenta, Yellow, and Key/Black). If your artwork is in RGB there may be slight colour changes on conversion.
Pantone Colours: Pantone colours will be matched to CMYK as closely as possible on our state-of-the-art EFI VUTEk FabriVU 340i+
Fonts: All fonts should be converted to outlines in your design software. We recommend not using a font size smaller than 62pt. Unsure how to do this? Check out our font guide here.
4. Design Within the Safe Zones
One key thing to remember is to keep all important elements like logos, text, and critical graphics within the exhibition stands 3mm safe zone. This ensures they won’t be cut off or distorted during the printing and trimming process.
Due to the huge size of our exhibition stands, you’ll need to zoom in on your template to see this clearly!
Definitions:
- Exhibition Stand Bleed Area: You will need to extend your design to fill the bleed area. This area will be trimmed to make sure you don’t have any unwanted white lines.
- Exhibition Stand Safe Zones: The 3mm inside of the cut line. Ensure all the important points and text of your design are kept away from this area. Any graphic in this area is being clipped when cutting.
- Exhibition Stand Cut Line: This is where we aim to cut your design to the finished size. Any part of your design placed on the outer side of this line will be cut off.
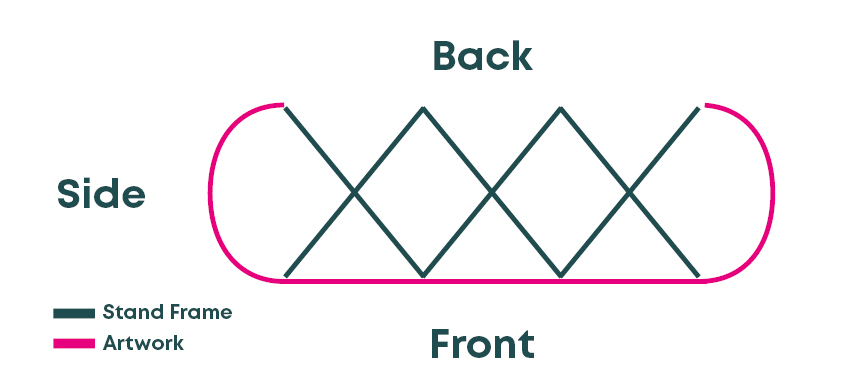
- Exhibition Stand Wrap Line: This area represents where your exhibition stand will wrap around, marked by two lines on either side of the template. We recommend extending your artwork into this space but keep in mind that you should only extend colours, graphics, or images. Text may not be visible or legible when viewed from the front of your stand, so it’s best to avoid extending any text into this wrap-around area.
Artwork Tip: The lines on either side of your template show where your exhibition stand wraps around the sides. Be mindful of this space to ensure your artwork aligns perfectly, transitioning smoothly from the front to the sides for a cohesive, eye-catching display.
5. Account for the Bleed
The bleed is an essential part of preparing your exhibition artwork for print. It’s an extra margin around the exhibition stand’s edge that will be trimmed off after printing, ensuring your design extends to the edge of the stand without leaving white borders.
You will need to extend your design to fill the bleed area. This area will be trimmed to make sure you don’t have any unwanted white lines.
6. Keep the Design Simple and Bold
Exhibition stands are your spotlight moment—designed to grab attention and spark interaction from afar! To make sure your design is clear and captivating, check out these tips to help your display stand out:
- Bold fonts and large text are essential for readability.
- Use high-contrast colour schemes (like black text on a white background) to ensure visibility.
- Avoid cluttered designs with too much text or fine details, which can get lost or hard to interpret on large prints.
Marketing Tip: Exhibition stands are all about making a memorable impression! Choose bold colours and eye-catching graphics that not only pop but also seamlessly wrap around your stand. This will create a cohesive look that grabs attention from every angle and invites visitors to come and explore! Don’t forget, if you intend on having a podium, stand or table, you may want to avoid putting any important details along the bottom of your stand.
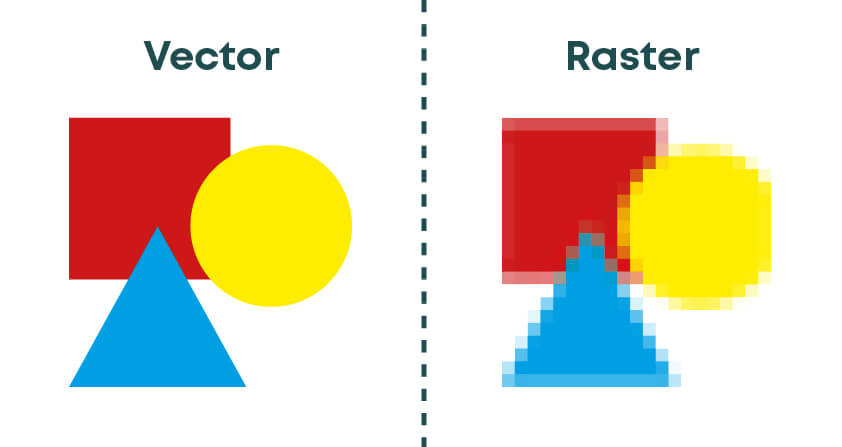
7. Use Vector Graphics
Wherever possible, use vector graphics (in formats like .AI, .EPS, or .PDF). Vector files allow you to scale your design without losing quality. This is especially important for large prints like exhibition stands, where raster images (images built from pixels E.G JPEGs) can become pixelated if not at a high resolution (Minimum 150 DPI recommended).
8. Double-Check Image Quality and Text
- Ensure any photos or raster images you use are at least 150 DPI at the actual size they’ll be printed.
- If using text, either outline it (in Adobe Illustrator) or embed the fonts so they are properly rendered by the printer.
Rasterized text in software like Photoshop should also be at a high resolution to avoid any blurriness.
9. Save and Export the File
Once your design is complete, save your file as either:
- AI (Adobe Illustrator file)
- EPS
- JPEG or PNG (usually for simpler designs or if requested by the printer)
Make sure your export settings include the bleed, and that you’re saving your file in CMYK color mode.
10. Final Review
Before sending your design to us at instantprint, take a moment to double-check everything. We know you’re excited to place your order, but it’s crucial to ensure everything is perfect before you hit that send button!
| Artwork Check | Action |
|---|---|
| 1. Safe Zone | Are all important elements (text, logos, graphics) inside the safe zone? |
| 2. Background Bleed | Did you extend the background or necessary design elements into the bleed area? |
| 3. Image Resolution | Is the resolution of images and graphics high enough for large format printing? |
| 4. Color Mode | Are the colours converted to CMYK for accurate print output? |
Taking the time to review these details will ensure that your banner turns out exactly how you envision it, without any printing issues.
Conclusion
Getting your artwork ready for printed exhibition stands might feel a bit overwhelming at first, but don’t worry! With these easy steps, you’ll have a design that looks professional and prints flawlessly. From picking the perfect template tomaking sure your graphics are easily readable from afar, a little planning goes a long way in creating an eye-catching stand that truly stands out in any crowd.
Ready to dive in? Follow these tips, and you’ll have your exhibition stand artwork print-ready in a snap!
Need Further Help? Let Our Studio Team Assist You!
Feeling unsure if your exhibition stand design is set up perfectly or just need a bit of guidance? Our expert studio team is here to help! Whether you’re tackling issues with bleed, safe zones, or simply want a second opinion on your artwork, our friendly designers can review your file to ensure everything is print-ready.
Just get in touch, and we’ll guide you through every step of the process to make sure your exhibition stand looks absolutely flawless. We’re just a message away!

.jpg)
.jpg)